Project: Sew a burrito-style pillowcase using one-way fabric, finished with French seams
Level: Advanced beginner. You should be comfortable measuring and cutting fabric, pinning, and sewing straight seams with a sewing machine
Tools/supplies: Ruler and rotary cutter, sewing machine, pins, iron, matching thread
Fabric needed: Good quality quilting cotton, amounts listed in the chart below
If you've ever looked up instructions for how to make a pillowcase, you've probably come across the "burrito method" of pillowcase construction. It's called the burrito method because you carefully arrange the three long components on top of each other, roll it up carefully, wrap everything inside the pillowcase cuff, then sew up one edge. When you pull out the fabric that's tucked inside, like magic, you've got a perfect pillowcase, with all of the seams completely hidden inside the cuff! Some people call it the magic pillowcase method, because it really feels magical.
There's only one problem with this method: the main pillowcase fabric comes out sideways. This is fine if the fabric is an overall print that looks good in every direction, but not if it's a one-way print. There are many tutorials online demonstrating how to make burrito pillowcases, but few explaining how to deal with one-way fabrics. Here's my version, with the measurements I've found work best.
One of the nice things about this method is that it's made using French seams, which is perfect if you don't have serger (but also lovely to do instead of serging your edges, even if you do have one). When you're finished making this pillowcase, you'll have completely enclosed, beautiful looking seams, so the pillowcase will look great on the inside too.
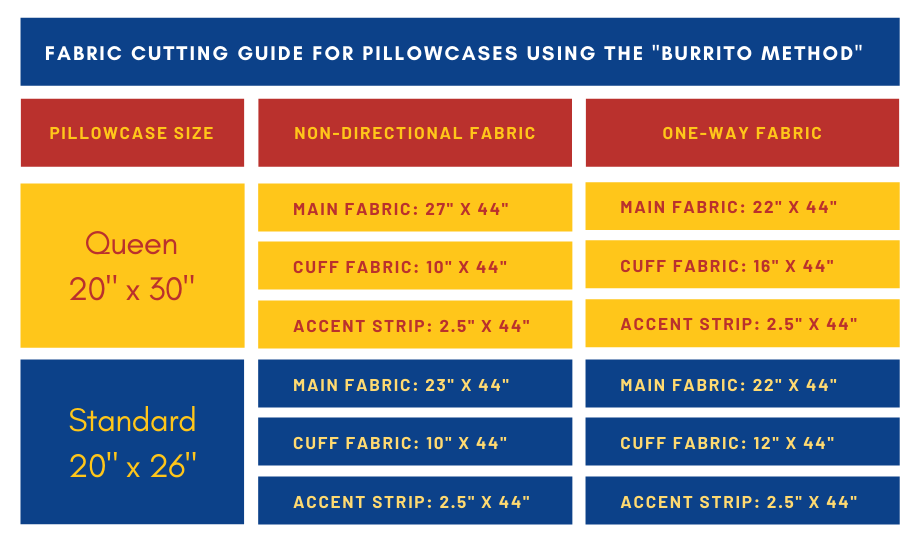
This pillowcase method requires one piece each of three fabrics: a main fabric, cuff fabric, and accent fabric (the little strip in between the main fabric and cuff). Here are cutting measurements for both non-directional and one-way fabrics using the burrito method. The measurements may seem strange, but trust me, they work!
Note 1: All three pieces are cut from the full width of the fabric (WOF), selvedge to selvedge. With most quilting fabrics this is about 44". Cut the full width even if your fabric widths are slightly different - the extra will be trimmed off later.
Note 2: The width of the accent strip doesn't affect the size of the pillowcase. 2.5" is my preference, but anything between 2" and 3" will look good.
Note 3: If you are making a pillowcase for someone else and don't know the exact size of the pillow, I recommend erring on the side of caution and making it queen size, the most popular pillow size.
Note 4: Yes, I know it's odd that for the one-way fabric the main pillowcase fabrics are the same sizes, whether Standard or Queen. That's because we're limited by the width of the fabric. With the One-Way method the cuff will be wider than with the non-directional method, and the cuff will be wider on a Queen-size pillowcase.
STEP ONE: Choose your fabric
You can mix and match prints and solids however your heart desires! I've chosen a feature print for the main fabric (a one-way print so I can show you how to work around this challenge), a fancy stripe for the cuff, and a solid for the accent strip. Here are my fabric choices for my demonstration pillowcase, still on the bolt:
How do you know if your fabric will come out sideways, and needs to be made with the One-Way method? Easy. Lay out your fabric with one of the the two selvedge edges at the bottom, like this:

The way your fabric looks with the selvedge at the bottom, is the way your pillowcase will look when it's finished. If it's sideways from this perspective, don't fret. You just need to use the One-Way method, which requires one extra step.
Note: If you don't want to bother with the One-Way method, there is a workaround. The catch? It uses much more fabric. If you want to, you can cut your main pillowcase fabric 44" x 44"/WOF and then trim it to 27" along one side (where the selvedge is), reserving the extra fabric for another project. If you choose to do that, you can cut your fabrics and rejoin us at step three.
The following instructions are for the One-Way method. If you want to use non-directional fabric you can cut your three pieces and then rejoin us at step three.
STEP TWO: Prepare your main fabric for the One-Way method
Before we get started, here's a little set of diagrams illustrating what we're about to do. This step can be hard to visualize - I hope this will help!


Okay, now back to the detailed instructions:
Take your main piece of fabric, which should measure 22" x WOF/44" regardless of the pillowcase size you're making, and trim off the selvedge from both sides:

Then fold your fabric in half, or measure carefully, and cut your fabric in half like so, to make two squarish pieces (this is the back of my fabric, that's why it looks lighter):

Did you notice the direction of the print and the direction of the cut? Good! If this is too much detail for you, just skim ahead. I'm trying to show every step clearly.
Now that you have two identical squarish pieces of beautiful fabric, layer them on top of each other nice sides out, in the same direction (my unicorns are upright in both pieces). Line them up carefully, like this, and pin along the top:

In the above photo I've flipped over the fabric on the left side so you can see that they're both facing the same direction. Now pin along the top edge, and sew a quarter inch seam, backstitching at the beginning and end of your seam:

I know it can feel funny to sew fabric nice sides out.... but we're making French seams, and this is how it's done! Don't worry, it's going to look great. You've got this.
Bring your fabric back to your work table, and carefully trim off some of the fabric from your seam. Using your ruler, cut it down to 1/8 inch (or a bit bigger if that makes you nervous). If you don't trim your fabric before finishing a French seam, threads will come poking through and drive you crazy. I learned that lesson the hard way!

Now that your seam is neatly trimmed, open out your fabric and smooth the seam a bit with your fingernail to make it nice and flat (this is called a finger press):

Now fold your pieces nice sides together on the seam, and iron your seam edge or continue using the finger method. The important thing is to have the seam fully pushed out to its edge, not folded in on itself. Once it's nice and flat, pin it along its full length:

Note: I usually pin perpendicular to the edge of the fabric, but with French seams I prefer to do it this way. This is just preference, all that matters is that you remove the pins as you're sewing, before you reach them.
Now stitch your seam again, making a 1/4" seam (or 3/8" if you prefer). Make sure to backstitch at the beginning and end of your stitching. It should look something like this:

Congratulations! You've made a lovely French seam. Now iron the seam to one side, and you have a beautiful piece of fabric with which to assemble your burrito. Your fabric should look something like this, with the top of your print facing toward the centre:

Hooray! Now you can cut your cuff and accent pieces if you haven't already, and we can assemble the pillowcase. Put aside your main fabric piece while we gather the other components.
Note: I just used many photos to explain something that takes about 5-10 minutes once you know what you're doing. If you're feeling overwhelmed by the length of this tutorial, please bear with me, it gets simpler from here on...
Note: If you are making your pillowcase from non-directional fabric, you can join the tutorial here. Just cut one piece each of your main, cuff, and accent fabric, trim off the selvedge edges, and start at step three.
STEP THREE: Prepare your cuff and accent strip
Cut your cuff fabric and accent strip fabric according the chart measurements. Trim the selvedge edges off the end of both fabrics. Then take your accent strip and iron it in half lengthwise, nice side out (if using a solid both sides may look identical), with the cut edges lined up together perfectly:

STEP FOUR: Assemble your burrito!
First, lay out your cuff fabric on a table, floor, wherever you have space for it to lay flat. It can hang over the edge of a table if that works for you (that's what I do):

Next, take the main pillowcase fabric and lay it on top of the cuff, nice side up, lining it up along one of the long edges like so:

When you're laying the main fabric on top of the cuff fabric, start at one short edge so that they're lined up along one short edge and the entire length of the long edge. Don't worry if the other short edge is uneven, this will be trimmed later.
Now take the folded accent piece and put it on top of the main fabric, along the long edge so that all three cut edges line up perfectly, and pin it in place. Make sure that you place the accent strip with the cut edges toward the outside!

In the above image, you can also see that the three pieces are also lined up at the left, along one short end. At the other end you can see that the pieces don't line up. Don't worry, this will be trimmed later:

After the three layers are nicely lined up and pinned, you need to roll the main fabric out of the way. Start by folding it in half (below left), then roll it some more, like so (in the below right image I folded it up in thirds):

That beautiful band of fabric at the bottom layer that you can now see is waiting for its starring role! It's the wrapper for this burrito.
Carefully take the cuff fabric and bring it over the main pillowcase fabric so that its other long edge matches up with the one that's pinned. As you do this, go along the edge and carefully repin all the layers together. Make sure that the main pillowcase fabric rolled up inside is back a little from the pinning area, out of the way. Make sure that the layers are lined up well, especially at the bottom layer where the fabric may have shifted:

Now you have your wrapped and pinned burrito ready to sew!
Note: I know this tutorial is very long. Once you understand the method, you will be at this stage in probably 10-20 minutes after starting to cut your fabric (you can take your sweet time or speed along). I'm explaining it very slowly, but the process is actually quite efficient and satisfying, even with the extra steps of the One-Way method.
STEP FIVE: Sew it up and prepare for the big reveal (the magic part!)
Carefully take your beautiful long pinned tube over to your sewing machine, and sew a quarter inch seam along the entire pinned length, definitely backstitching at the beginning and end (on this seam it's very important to do so). As you sew, make sure the cut edges are nicely lined up, and adjust to line them up better if needed. When you're done sewing your long seam, you should have a nice long tube, something like this:
 See the seam at the top? Don't trim it down, we're not making a French seam here. This will be completely hidden inside the cuff.
Now reach into one end of the tube and gently start to pull out the main pillowcase fabric:

Keep pulling until it's all out...

Until voila! Your pillowcase is now one beautiful piece, with the seams all hidden inside the cuff. The front should look like this:
 And the back should look something like this, nice and neat (but quite poufy):

Isn't that a thing of beauty? We're almost done!
Now you're going to gently tug the cuff fabric so that the seams along the edge are nice and flat (and fully open), and press it. Make sure you check front and back to make sure the seam isn't folded inside itself, but is nicely extended and flat:

See how the bottom edge is not lined up? As soon as the cuff is pressed we'll take care of that.
When the cuff is pressed, check it front and back along the main seam to make sure it's pulled out and neatly pressed. This is how it should look from the back:
 Great job! Now we really are almost done. You know the centre seam where you sewed together your main pillowcase fabrics head-to-head (if you are using one-way fabrics)? Fold the pillowcase in half, nice sides out, at that centre seam (if you're using non-directional fabric, just find the halfway point and fold it there):

The bottom edge will not be even. Now is the time to trim that bottom edge so that it is straight and even. Make sure you check the underneath piece to make sure it's not shorter. This is my pillowcase before trimming the bottom edge:

After you've trimmed the bottom edge so that everything is straight and neat, pin along the bottom edge and the open side opposite the cuff). Make sure you first line up the accent strips and the outer edge of the pillowcase cuff. Match these as carefully as you can.
At the machine, sew up these two seams, starting from the edge of the cuff and being careful to match up the cuff edge and accent strip (you don't want these shifting). Sew all the way around using a quarter inch seam, backstitching at the beginning and end.
 When you get to the corner, you can either pivot and continue sewing, or go off the edge and then do another line of stitching for the short open end of the pillowcase, up to you.
 We are once again sewing with the nice sides out, because we are making French seams! We are SO close to the finish line now.
After you've sewn your outer seams, bring your pillowcase back to your work table and trim down the seams a bit, as you did before. You can also snip off a bit of the corner to reduce bulk there.

Sorry I didn't get a good photo of this. Try to picture my seams neatly trimmed.
Now turn your pillowcase inside-out and gently push out the corners with a chopstick or similar pointy (but not too pointy) object. Also push out the seams all around with your finger or a tool so they're not tucked in:

Once the edges and corners are all smoothed out, pin around both unfinished sides:

Sew along both edges, starting at the cuff, backstitching at the beginning and end, with a 3/8" seam. And now...
You are DONE!!! Congratulations! Turn your pillowcase right side out, gently push out the corners again, and give it a good press.
 This is my finished pillowcase. I wish I could see yours! If you have any questions or suggestions please let me know in the comments. I'd love to hear from you.
In this tutorial, you've learned how to sew "burrito-method" pillowcases using both non-directional and one-way fabrics, and you've learned how to sew French seams. I hope you enjoyed it, and I hope you'll go on to make more pillowcases. They make great handmade gifts and are especially fun to make for children. Happy sewing!
]]>


 My fabrics are Les Chats Noirs "Having a Meowment" (feature), Free Spirit Designer Essentials Solids in Rouge (border), and Les Chats Noirs "Checkmate" (accent).